���@��������ѕ����� �@�@�@�@�@�@�@�@�@�@�@�@�@�@�@�@![]() �@�@�@
�@�@�@![]() �@�@
�@�@
���@�����F�A�w�i�F�A�t�H���g�A�����A�C�^���b�N�A�������@����
| �@ | ���x���A�{�^�������̑����Ɋ֘A�������L���@�ɂ��ďЉ�܂��B�@ �@�@�E�����F�y�ѕ����̔w�i�F�ύX �@�@�E�t�H���g�y�уt�H���g�T�C�Y�ύX �@�@�E�������A�C�^���b�N���A�����lj��@ �@�@���{�^���̔w�i�F���ݒ�ł��܂��B ��Form1.h ������ |
|
private:
System::Void button1_Click(System::Object^ sender, System::EventArgs^ e)
{
label1->Text = "Hello Wolrd !!";
label1->ForeColor = Color::Blue;
label1->BackColor = Color::Yellow;
label1->Font = gcnew System::Drawing::Font("�l�r ����", //���́@MS����
// label1->Font = gcnew System::Drawing::Font("�l�r �S�V�b�N", //���́@MS�S�V�b�N
24, FontStyle::Bold | FontStyle::Italic | FontStyle::Underline);
//�@�����T�C�Y�F24�@�����A�C�^���b�N�A����
button1->ForeColor = Color::Red; // �{�^���̎��̐F�@���@��
button1->BackColor = Color::LightGreen; //�w�i�F�@���@����
}
|
 |
| �@ | ���v���O�����၄ Form1.h���� |
| �@ |
public:
Form1(void)
{
InitializeComponent();
String^ str1 = "�N�N�Ήԑ���";�@//���������A���e����������
String^ str2 = "�ΔN�N�l�s��";
textBox1->Text = str1;
textBox2->Text = str2;
}
private: System::
Void button1_Click(System::Object^ sender, System::EventArgs^ e)
{
String^ str3 = textBox1->Text;
String^ str4 = textBox2->Text;
textBox3->Text = str3 + "�@" + str4;�@//�����A��
textBox4->Text = textBox3->Text->Length.ToString();//�������擾
}
|
| �����s���ʁ� |  |
| �@�@�@�@�@�@ ................... |
���v���O�����၄ Form1.h ���� |
�@�@�@ |
| �@�@�@�@�@ |
private: System::
Void button1_Click(System::Object^ sender, System::EventArgs^ e)
{
int ix = 1234; //����
int iy = 5678;
double PAI = 3.1416; //��������
double SIN60 = 0.866;
String^ strX = ix.ToString();
textBox1->Text = strX;
String^ strY = Convert::ToString(iy);
textBox2->Text = strY;
textBox3->Text = PAI.ToString(); //
textBox4->Text = Convert::ToString(SIN60);
// textBox4->Text = (Stirng^)PAI; //Stirng^�ŃL���X�g�͂ł��Ȃ�
}
}
|
 |
���@���l�̕\��
| �����𐮂�����Ƃ���String::Format(�@�j������ | �����s���ʁ� |
|
�@�@�@�@�@�@�@�@�@�@ �@���v���O�����၄
#pragma once
namespace CWhiteForm {
using namespace System;
using namespace System::ComponentModel;
using namespace System::Collections;
using namespace System::Windows::Forms;
using namespace System::Data;
using namespace System::Drawing;
/// <summary>
/// Form1 �̊T�v
/// </summary>
public ref class Form1 : public System::Windows::Forms::Form
{
public:
Form1(void)
{
InitializeComponent();
//
//TODO: �����ɃR���X�g���N�^�[ �R�[�h��lj����܂�
//
}
#pragma endregion
private: System::Void button1_Click(System::Object^ sender, System::EventArgs^ e)
{
//����--------
int Ix = 1234;
String^ myString1 = Ix.ToString();
textBox1->Text = myString1;
String^ myString2 = Convert::ToString(Ix);
textBox2->Text = myString2;
//��������--------
double X1 = 5678.9123;
String^ myString3 = X1.ToString();
textBox3->Text = myString3;
String^ myString4 = Convert::ToString(X1);
textBox4->Text = myString4;
//������16�i���\��
int Iy = 5678;
String^ myString5 = String::Format("{0}��16�i�� = {1:X4}",Iy,Iy); //X:16�i��
textBox5->Text = myString5;
String^ myString6 = Convert::ToString(Iy,16);
textBox6->Text = myString6;
//�����_�ȉ�2���̕�������
double Y1 = 234.456789;
String^ myString7 = String::Format("{0}�@���@{1:F2}",Y1,Y1); //F2: �����_�ȉ�2��
textBox7->Text = myString7;
}
.....
.....
|
 |
���@������̐��l���@�@�@�@�@�@�@�@�@�@�@�@�@�@�@�@�@�@�@�@�@�@�@�@�@�@�@�@�@�@�@�@
| �@�@ | ���v���O�����၄ Form1.h���� |
�@�@�@�@ |
�@���v���O�����၄
public:
Form1(void)
{
InitializeComponent();
textBox1->TextAlign = HorizontalAlignment::Right; //�������E�[��
textBox2->TextAlign = HorizontalAlignment::Right; //�������E�[��
textBox3->TextAlign = HorizontalAlignment::Right; //�������E�[��
}
private: System::
Void button1_Click(System::Object^ sender, System::EventArgs^ e)
{
double d;
System::Windows::Forms::DialogResult ret; //MessageBox�{�^���̖߂�l
String^ str1 = textBox1->Text;
String^ str2 = textBox2->Text;
try //
{
d = Convert::ToDouble(str1) + Convert::ToDouble(str2); //������������֕ϊ�
//Convert::ToInt32(str)
}
catch(Exception^ )
{
ret = MessageBox::Show(
"��������͂��Ă�������", //�\��������
"�����ɕϊ��ł��܂���", //�^�C�g���o�[������
MessageBoxButtons::YesNoCancel, //�\�������{�^���̎��
MessageBoxIcon::Information, //�\�������A�C�R���̎��
MessageBoxDefaultButton::Button1//�i�\�������{�^���̂Ȃ��Łj
//�f�t�H���g�����{�^���̎w��);
if(ret == System::Windows::Forms::DialogResult::No)Form1::Close();
//�t�H�[�������
else
{
textBox1->Text = "";
textBox2->Text = "";
textBox3->Text = "";
return;
}
}
textBox3->Text = d.ToString(); //������ɕϊ����ĕ\��
}
|
�������ɕϊ��ł��镶�������ꂽ�ꍇ��  �������ɕϊ��ł��Ȃ����������ꂽ�ꍇ��  |
| �Ō����ꂽ�L�[�̒l��ǂݎ���ł��B�@ �@�E�@KeyPress�C�x���g�Ō��o���܂��B�@KeyDown�C�x���g�ł͌��o�ł��܂���B �@�E�@KeyPreview = true;�@�� �s�v�ł��B |
�����s���ʁ� |
|
�@�@�@�@�@�@�@�@�@�@ �@���v���O�����၄
private: System::Void Form1_KeyPress(System::Object^ sender, System::Windows::Forms::KeyPressEventArgs^ e)
{
label1->Text = String::Format("{0} = {1}","e->KeyChar",e->KeyChar); //KeyDown��NG
}
};
�@ |
 a ��Ō��̏ꍇ  shift + 5/%�@��Ō��̏ꍇ |
| �Ō����ꂽ�@�L�[�ʂ����ł��B �@�E�t�H�[���̃v���p�e�B�ŁAKeyPreview = true; ���K�v�ł��B �@�EKeyDown�C�x���g�Ō��o���܂��B�@�@KeyPress �ł͌��o�ł��܂���B |
�����s���ʁ� |
|
�@�@�@�@�@�@�@�@�@�@ �@���v���O�����၄
public:
Form1(void)
{
InitializeComponent();
//
//TODO: �����ɃR���X�g���N�^�[ �R�[�h��lj����܂�
//
this->KeyPreview = true;
}
private: System::Void Form1_KeyDown(System::Object^ sender, System::Windows::Forms::KeyEventArgs^ e) //KeyPress��NG
{
switch (e->KeyCode)
{
case Keys::Enter:
listBox1->Items->Add("keys.Enter"); break; //Enter�L�[
case Keys::A:
listBox1->Items->Add("Keys.A"); break; //A
case Keys::D3:
listBox1->Items->Add("Keys.D3"); break; //3
case Keys::NumPad3:
listBox1->Items->Add("Keys.NumPad3"); break; //Num�L�[��3
case Keys::F12:
listBox1->Items->Add("Keys.F12"); break; //�t�@���N�V�����L�[F12
default: break;
}
}
�@ |
 |
���@������ASCII�����\���A16�i���\���ɂ���iC���ꗬ�j
| �����s���ʁ� | |
|
�@�@�@�@�@ �@�@�@�@�@�@�@�@�@�@ �@���v���O�����၄
#pragma once
// char*�^�@���@String^�^�@�A�@String^�^�@���@char*�^
#include <msclr\marshal.h> //marshal.h�́@�O���[�o���X�R�[�v�ŃC���N���[�h�̂���
#include <msclr\marshal_cppstd.h> //marshal_cppstd.h�́@�O���[�o���X�R�[�v�ŃC���N���[�h�̂���
#include<stdio.h>
#include<string.h> //std::string�^�̕�������g���ꍇ�K�v
namespace CWhiteForm {
using namespace System;
using namespace System::ComponentModel;
using namespace System::Collections;
using namespace System::Windows::Forms;
using namespace System::Data;
using namespace System::Drawing;
using namespace msclr::interop; //�}�[�V�������O���\�b�h�������ꍇ�K�v
using namespace std; //std::string�^�̕�������g�p����ꍇ�K�v
/// <summary>
/// Form1 �̊T�v
/// </summary>
public ref class Form1 : public System::Windows::Forms::Form
{
public:
Form1(void)
{
InitializeComponent();
//
//TODO: �����ɃR���X�g���N�^�[ �R�[�h��lj����܂�
//
}
#pragma endregion
private: System::Void button1_Click(System::Object^ sender, System::EventArgs^ e)
{
//�����̕\��--------------------------------------------------------------------
int I1 = 65; // 0x41; //A
int I2 = 66; // 0x42; //B
int I3 = 67; // 0x43; //C
textBox1->Text = I1.ToString(); //��������ɕϊ�����
textBox2->Text = I2.ToString();
textBox3->Text = I3.ToString();
//ASCII�����\��--------------------------------------------------------------------
char ChrCode1 = (char)I1; //������(ASCII)�����ɕϊ�
char ChrCode2 = (char)I2;
char ChrCode3 = (char)I3;
char* ptr1 = &ChrCode1; //�����̃A�h���X�ɐ����̃A�h���X���Z�b�g
char* ptr2 = &ChrCode2;
char* ptr3 = &ChrCode3;
String^ str1 = marshal_as<String^>( ptr1 ); //C���ꕶ������@C++/CLI����̕�����i�}�l�[�W�^�j�ŏ�����
String^ str2 = marshal_as<String^>( ptr2 );
String^ str3 = marshal_as<String^>( ptr3 );
textBox4->Text = str1; //�e�L�X�g�{�b�N�X�ɕ\��
textBox5->Text = str2;
textBox6->Text = str3;
//16�i���\��---------------------------------------------------------------------------------
textBox7->Text = Convert::ToString(I1,16); //������16�i�\���̕�����ɕϊ�����
textBox8->Text = Convert::ToString(I2,16);
textBox9->Text = Convert::ToString(I3,16);
}
.....
.....
�@ |
 |
���@�}�[�V�������O (char*�^�@vs�@String^�^)
�@C���ꕶ����char*�i�l�C�e�B�u�^�j�� C++/CLI ������ String^�i�}�l�[�W�^�j�̃}�[�V�������O�i�f�[�^�^�ϊ��j�̗���Љ�܂��B
| �@�@ | ���v���O�����၄ Form1.h�@���� |
�@�@�@ |
| �@�@ |
// char*�^�@���@String^�^�@�A�@String^�^�@���@char*�^
#include <msclr\marshal.h> //marshal.h�́@�O���[�o���X�R�[�v�ŃC���N���[�h�̂���
#include<stdio.h>
namespace �}�[�V�������O {
using namespace System;
using namespace System::ComponentModel;
using namespace System::Collections;
using namespace System::Windows::Forms;
using namespace System::Data;
using namespace System::Drawing;
using namespace msclr::interop; //�}�[�V�������O���\�b�h�������ꍇ�K�v
public ref class Form1 : public System::Windows::Forms::Form
{
public:
Form1(void)
{
InitializeComponent();
}
private: System::
Void button1_Click(System::Object^ sender, System::EventArgs^ e)
{
const char* str_char = "How are you ?"; //C����̕�����i�l�C�e�B�u�^�j��錾���āA������
String^ str_managed; //C++/CLI����̕�����i�}�l�[�W�^�j��錾
str_managed = marshal_as<String^>( str_char );
//marshal_as()���Ńl�C�e�B�u�^���}�l�[�W�^�փ}�[�V�������O
textBox1->Text = str_managed; //�e�L�X�g�{�b�N�X�ɕ\��
String^ str_managed2 = "I am fine."; //C++/CLI����̕�����i�}�l�[�W�^�j�錾���āA������
const char* ptr; //C����̕������������
marshal_context^ mycontext = gcnew marshal_context();//�R���e�L�X�g�̃I�u�W�F�N�g����
ptr = mycontext->marshal_as<const char*>(str_managed2);//ptr��C���ꕶ����̃|�C���^
//marshal_contex()�N���X��marshal_as()���\�b�h�Ń}�l�[�W�^���l�C�e�B�u�^�փ}�[�V�������O
String^ str_out = marshal_as<String^>( ptr );//�\���̂��߁A�l�C�e�B�u�^���ēx�}�l�[�W�^�ɕϊ�
textBox2->Text = str_out;
}
|
 |
���@�}�[�V�������O�istd::string�^�@�����@String^�^�j
�@C++����std::string�^�i�l�[�e�B�u�^�j�Ɓ@C++/CLI����String^�^�i�}�l�[�W�^�j�Ԃ̃}�[�V�������O�i�f�[�^�^�ϊ��j�̗���Љ�܂��B
| �@ |
���v���O�����၄ Form1.h�@���� |
�@�@�@�@ |
| �@ |
// string�^�@���@String^�^�@�A�@String^�^�@���@string�^
#include<string> //std::string�^�̕�������g���ꍇ�K�v
#include <msclr\marshal_cppstd.h>
//marshal_cppstd.h�́@�O���[�o���X�R�[�v�ŃC���N���[�h�̂���
namespace marsharingstring {
using namespace System;
using namespace System::ComponentModel;
using namespace System::Collections;
using namespace System::Windows::Forms;
using namespace System::Data;
using namespace System::Drawing;
using namespace std; //std::string�^�̕�������g�p����ꍇ�K�v
using namespace msclr::interop; //�}�[�V�������O���\�b�h�������ꍇ�K�v
public ref class Form1 : public System::Windows::Forms::Form
{
public:
Form1(void)
{
InitializeComponent();
}
private: System::
Void button1_Click(System::Object^ sender, System::EventArgs^ e)
{
string Question_string = "What is this ?";
String^ Question_managed; //C++/CLI����̕�����i�}�l�[�W�^�j��錾
Question_managed = marshal_as<String^>(Question_string);
//marshal_as()���Ńl�C�e�B�u�^���}�l�[�W�^�փ}�[�V�������O
textBox1->Text = Question_managed;
String^ Answer_managed = "It is an Apple.";
string Answer_string;
marshal_context^ mycontext = gcnew marshal_context();
//�R���e�L�X�g�̃I�u�W�F�N�g����
Answer_string = mycontext->marshal_as<string>(Answer_managed);
String^ str_out = marshal_as<String^>(Answer_string);
//�\���̂��߁A�l�C�e�B�u�^���ēx�}�l�[�W�^�ɕϊ�
textBox2->Text = str_out;
}
~Form1()
{
if (components)
{
delete components;
}
}
|
 |
���@C���ꕶ�����C++/CLI������̕\���Ƒ���
| �����s���ʁ� | |
|
�EC���ꕶ�����C++��������e�L�X�g�{�b�N�X�ɋL�ڂ���ɂ�marshal_as<String^>( )�Ń}�[�V�������O���ā@String^�^�ɕϊ�����B �@���v���O�����၄
#pragma once
// char*�^�@���@String^�^�@�A�@String^�^�@���@char*�^
#include <msclr\marshal.h> //marshal.h�́@�O���[�o���X�R�[�v�ŃC���N���[�h�̂���
#include <msclr\marshal_cppstd.h> //marshal_cppstd.h�́@�O���[�o���X�R�[�v�ŃC���N���[�h�̂���
#include<stdio.h>
#include<string.h> //std::string�^�̕�������g���ꍇ�K�v
namespace CWhiteForm {
using namespace System;
using namespace System::ComponentModel;
using namespace System::Collections;
using namespace System::Windows::Forms;
using namespace System::Data;
using namespace System::Drawing;
using namespace msclr::interop; //�}�[�V�������O���\�b�h�������ꍇ�K�v
using namespace std; //std::string�^�̕�������g�p����ꍇ�K�v
/// <summary>
/// Form1 �̊T�v
/// </summary>
public ref class Form1 : public System::Windows::Forms::Form
{
public:
Form1(void)
{
InitializeComponent();
//
//TODO: �����ɃR���X�g���N�^�[ �R�[�h��lj����܂�
//
}
#pragma endregion
private: System::Void button1_Click(System::Object^ sender, System::EventArgs^ e)
{
//-------------------------------------------------------------------
//C���ꕶ����
char* str1_c = "�{���͐��V�Ȃ�";
//C++��������e�L�X�g�{�b�N�X�ɋL�ڂ���ɂ�marshal_as<String^>( )�Ń}�[�V�������O����
textBox1->Text = marshal_as<String^>(str1_c); //String^�^�ɕϊ�
//-------------------------------------------------------------------
//C++/CLI ������ //string �� basic_string�N���X��typedef���ꂽ���̂ł���
//C++��������e�L�X�g�{�b�N�X�ɋL�ڂ���ɂ�marshal_as<String^>�Ń}�[�V�������O����
string str2_c ="�n���[ World !!";
textBox2->Text = marshal_as<String^>(str2_c); //String^�^�ɕϊ�
//---------------------------------------------------------------------
//�t�Ƀ��x�������� ���x���̕�����string�^�ɂ���ɂ�marshal_as<string>�Ō^�ϊ�����
string str3_c = marshal_as<string>(label1->Text); //string�^�ɕϊ�
string str4_c = "�́A���{�ꍂ���R�ł�";
string str5_c = str3_c + str4_c;
textBox3->Text = marshal_as<String^>(str5_c); //String^�^�ɕϊ�
}
.......
.......
|
 |
���@C���ꕶ����̔z�Ɣz���ASCII�����\����16�i���\��
| C����̕������z���āA�@���̊e�z��̒l���@ASCII�����\���A10�i���̐����\���@�y��16�i���\�������v���O�����ł��B�B | |
|
�@�@�@�@�@�@�@�@�@�@ �@���v���O�����၄
#pragma once
// char*�^�@���@String^�^�@�A�@String^�^�@���@char*�^
#include <msclr\marshal.h> //marshal.h�́@�O���[�o���X�R�[�v�ŃC���N���[�h�̂���
#include <msclr\marshal_cppstd.h> //marshal_cppstd.h�́@�O���[�o���X�R�[�v�ŃC���N���[�h�̂���
#include<stdio.h>
#include<string.h> //std::string�^�̕�������g���ꍇ�K�v
namespace CWhiteForm {
using namespace System;
using namespace System::ComponentModel;
using namespace System::Collections;
using namespace System::Windows::Forms;
using namespace System::Data;
using namespace System::Drawing;
using namespace msclr::interop; //�}�[�V�������O���\�b�h�������ꍇ�K�v
using namespace std; //std::string�^�̕�������g�p����ꍇ�K�v
/// <summary>
/// Form1 �̊T�v
/// </summary>
public ref class Form1 : public System::Windows::Forms::Form
{
public:
Form1(void)
{
InitializeComponent();
//
//TODO: �����ɃR���X�g���N�^�[ �R�[�h��lj����܂�
//
}
#pragma endregion
private: System::Void button1_Click(System::Object^ sender, System::EventArgs^ e)
{
int i;
//---------------------------------------------------------------------------------
//�e�L�X�g�{�b�N�X
char AX[64];
char* myStr = "Japan";
sprintf(AX,"%s",myStr); //������Ƃ��ăo�b�t�@�[�Ɏ��[
array<String^>^ mAX = gcnew array<String^>(64); //�}�l�[�W�z����`
i = 0;
for each(char s in AX) //char�̔z��AX[64]���ׂĂɑ��Ď��s
{
char ch = AX[i];
char* ptr;
ptr = &ch;
mAX[i] = marshal_as<String^>(ptr); //�z��̒l���}�[�V�������O
i++;
}
textBox1->Text
= String::Format("AX[0]={0}, AX[1]={1}, AX[2]={2}, AX[3]={3}, AX[4]={4}",
mAX[0],mAX[1],mAX[2],mAX[3],mAX[4]);
//--------------------------------------------------------------------------------------
//���b�`�e�L�X�g
array<String^>^ mBX = gcnew array<String^>(64); //�A�X�L�[�����̃����� //�}�l�[�W�z����`
array<String^>^ mBX16 = gcnew array<String^>(64); //16�i���̃����� //�}�l�[�W�z����`
char BX[64];
char* myStr2 = "Hellow World !! Today is Sunday. How are you?";
sprintf(BX,"%s",myStr2);
i = 0;
for each(char s in BX) //char�̔z��BX[64]���ׂĂɑ��Ď��s
{
char ch = BX[i];
char* ptr;
ptr = &ch;
mBX[i] = marshal_as<String^>(ptr); //�z��̒l���}�[�V�������O
int Ix = (int)BX[i];
mBX16[i] = Convert::ToString(Ix,16); //������16�i�\���̕�����ɕϊ�����
richTextBox1->SelectedText = //���b�`�e�L�X�g�ɕ\��
String::Format("BX[{0}]: {1}, {2} 0x{3}\r",i,mBX[i],Ix,mBX16[i]);
i++;
}
}
.......
.......
�@ |
 |
���@String^ �������Byte�^�AChar�^�z��ւ̕ϊ��Ɣz��l��16�i���\��
| �@String^ ��������@�}�l�[�W�^�̔z��@Byte�^��Char�^�z��ɕϊ����ā@16�i�\�������v���O�����ł��B�@���ʂ̃_�C�A���O���݂�� Byte�^�^�z��̓��g���G���f�B�A���ɕϊ�����Ă���̂��킩��܂��B�@�܂��A�T�C�Y�́@Char�^��2�o�C�g�AByte�^��1�o�C�g�ł��邱�Ƃ� �\������Ă��܂��B |
�����s���ʁ� |
|
�@�@�@�@�@�@�@�@�@�@ �@���v���O�����၄
#pragma once
// char*�^�@���@String^�^�@�A�@String^�^�@���@char*�^
#include <msclr\marshal.h> //marshal.h�́@�O���[�o���X�R�[�v�ŃC���N���[�h�̂���
#include <msclr\marshal_cppstd.h> //marshal_cppstd.h�́@�O���[�o���X�R�[�v�ŃC���N���[�h�̂���
#include<stdio.h>
#include<string.h> //std::string�^�̕�������g���ꍇ�K�v
namespace CWhiteForm {
using namespace System;
using namespace System::ComponentModel;
using namespace System::Collections;
using namespace System::Windows::Forms;
using namespace System::Data;
using namespace System::Drawing;
using namespace msclr::interop; //�}�[�V�������O���\�b�h�������ꍇ�K�v
using namespace std; //std::string�^�̕�������g�p����ꍇ�K�v
/// <summary>
/// Form1 �̊T�v
/// </summary>
public ref class Form1 : public System::Windows::Forms::Form
{
public:
Form1(void)
{
InitializeComponent();
//
//TODO: �����ɃR���X�g���N�^�[ �R�[�h��lj����܂�
//
}
}
#pragma endregion
private: System::Void button1_Click(System::Object^ sender, System::EventArgs^ e)
{
String^ str1 = "�������{��ABCDE12345";
array<Char>^ ch = str1->ToCharArray(); //������� �����iChar�F2�o�C�g)�̔z��ɕϊ�����
//�z�̂��ꂼ��̗v�f�ɑ��ď������s��
for each(Char c in ch) //c:�z��̕ϐ����@�@ch:�z��
{
richTextBox1->SelectedText = String::Format("{0}:�@0x{1:X4}\r\n\n",c,(int)c);
}
int intSize = sizeof(Char);
label5->Text = String::Format("�T�C�Y��{0}�o�C�g",intSize.ToString());
array<Byte>^ bytes = System::Text::Encoding::Unicode->GetBytes(str1);
for each(Byte b in bytes)
{
richTextBox2->SelectedText = String::Format("{0:X}\r",b);
}
intSize = sizeof(Byte);
label6->Text = String::Format("�T�C�Y��{0}�o�C�g",intSize.ToString());
}
�@ |
 |
���@ToCharArray( )���g��Ȃ��ŁAString^������Char�^�z����擾����
| ToCharArry(�j���g��Ȃ��Ă��AString^ �ϐ�����[ ]�����邾����Char�^�̔z�擾�ł��܂��B�iVC++ 2012) �@�ȉ��͂��̗�ł� |
|
�@�@�@�@�@�@�@�@�@�@ �@���v���O�����၄
private: System::Void button1_Click(System::Object^ sender, System::EventArgs^ e)
{
String^ str = textBox1->Text;
richTextBox1->AppendText(String::Format("{0}\n",str[0]));
richTextBox1->AppendText(String::Format("{0}\n",str[1]));
richTextBox1->AppendText(String::Format("{0}\n",str[2]));
richTextBox1->AppendText(String::Format("{0}\n",str[3]));
}
};
�@
|
�����s���ʁ� |
���@�z��v�f��ύX��A�������ĕ\���@ �@�@//�@�@���b�`�e�L�X�g�{�b�N�X�F�@N�s�ڂ̕������u������
| �z��̗v�f��ύX��A�S�z����������ĕ\�������ł� |
|
|
�@�@�@�@�@�@�@�@�@�@ �@���v���O�����၄
namespace CWhiteForm {
using namespace System;
using namespace System::ComponentModel;
using namespace System::Collections;
using namespace System::Windows::Forms;
using namespace System::Data;
using namespace System::Drawing;
/// <summary>
/// Form1 �̊T�v
/// </summary>
public ref class Form1 : public System::Windows::Forms::Form
{
public:
Form1(void)
{
InitializeComponent();
//
//TODO: �����ɃR���X�g���N�^�[ �R�[�h��lj����܂�
//
String^ str = "000a,000b,000c\n111a,111b,111c,\n"
+ "222a,222b,222c,\n333a,333b,333c,\n"
+ "444a,444b,444c,\n555a,555b,555c,\n"
+ "666a,666b,666c,\n777a,777b,777c,\n"
+ "888a,888b,888c,\n999a,999b,999c,\n";
richTextBox1->Text = str;
}
private: System::Void button1_Click(System::Object^ sender, System::EventArgs^ e)
{
String^ str = richTextBox1->Text;
array<String^>^ary1 = gcnew array<String^>(str->Length);
ary1 = richTextBox1->Lines;//�s���ɔz��v�f�Ƃ��ď����� //�z��v�f��\n�͊܂܂�Ȃ�
ary1[2] = "AAAAAA,BBBBBB,CCCCCC";
richTextBox1->Text = String::Join("\n",ary1); //�z��̌���
//String::Join("��蕶��", �z��, �W�J�J�n�̃C���f�b�N�X, �W�J����z��)
}
|
|
| �����s���ʁ� | |
���{�^���P�N���b�N�O�� |
���{�^��1�N���b�N�い |
| ������@"123,456,789,111,222,333,444,555,666,777,888,999"���@","�@���Ɂ@�܂�","�Q���ɉ��s���ă��b�`�e�L�X�g�{�b�N�X�ɕ\������v���O�����ł��B |
|
�@�@�@�@�@�@�@�@�@�@ From1.h ���� �@���v���O�����၄
pragma once
namespace CWhiteForm {
using namespace System;
using namespace System::ComponentModel;
using namespace System::Collections;
using namespace System::Windows::Forms;
using namespace System::Data;
using namespace System::Drawing;
/// <summary>
/// Form1 �̊T�v
/// </summary>
public ref class Form1 : public System::Windows::Forms::Form
{
static String^ str = "123,456,789,111,222,333,444,555,666,777,888,999";
public:
Form1(void)
{
InitializeComponent();
richTextBox3->Text = str; //�f�[�^�̕\��
}
private: System::Void button1_Click(System::Object^ sender, System::EventArgs^ e)
{
int itemp = 0;
String^ str1 = str;
String^ str2 = str;
while(1) //�@,���ɉ��s
{
itemp = str1->IndexOf(',',itemp +1);
if(itemp == -1)break; //
str1 = str1->Insert(itemp +1,"\n");
}
richTextBox1->Text = str1;
itemp = 0;
while(1) //�@,�~2�@���ɉ��s
{
itemp = str2->IndexOf(',',itemp +1);
if(itemp == -1)break; //
itemp = str2->IndexOf(',',itemp +1);
if(itemp == -1)break; //
str2 = str2->Insert(itemp +1,"\n");
}
richTextBox2->Text = str2;
}
}
�@ |
�����s���ʁ� |
���@������� ��蕶���ł̔z���A�v�f���擾
| ������@"123,456,789,111,222,333,444,555,666,777,888,999"���@","�@���ɔz���ĕ\������v���O�����ł��B |
|
Form1.h �����@�@�@�@�@�@�@�@�@�@ �@���v���O�����၄
#pragma once
namespace CWhiteForm {
using namespace System;
using namespace System::ComponentModel;
using namespace System::Collections;
using namespace System::Windows::Forms;
using namespace System::Data;
using namespace System::Drawing;
/// <summary>
/// Form1 �̊T�v
/// </summary>
public ref class Form1 : public System::Windows::Forms::Form
{
static String^ str = "123,456,789,111,222,333,444,555,666,777,888,999";
public:
Form1(void)
{
InitializeComponent();
richTextBox2->Text = str;
}
private: System::Void button1_Click(System::Object^ sender, System::EventArgs^ e)
{
// �J���}���ŕ������Ĕz��Ɋi�[����
array<String^>^Data = str->Split(',');
int i = 0;
for each (String^ t in Data)
{
listBox1->Items->Add(t); //���X�g�{�b�N�X�ւ̃A�C�e���ɒlj�
i++;
}
String^ tempStr ;
i = 0;
for each (String^ t in Data)
{
tempStr = String::Format("Data[{0}] = {1}",i,t);
listBox2->Items->Insert(i,tempStr); //���X�g�{�b�N�X�ւ̃A�C�e���ɒlj�
i++;
}
int Num = Data->Length; //�z��̗v�f���擾
textBox1->Text = Num.ToString();
//i = 0;
for(i = 0; i < Num; i++)
{
tempStr = String::Format("Data[{0}] = {1}\n",i,Data[i]);
richTextBox1->SelectedText = tempStr; //���b�`�e�L�X�g�{�b�N�X�ւ̍s�lj�
}
}
}
|
�����s���ʁ� |
���@�V�t�gJIS�AJIS�����@�����R�[�h�ϊ�
| �L�[�{�[�h����e�L�X�g�{�b�N�X�ɓ��͂��ꂽ�����̕����R�[�h���A�ȉ��̗v�̂ŕ\������v���O�����ł��B �@�@�@���͕����ɑ��āAWindows�ɂ�苁�߂�ꂽ�V�t�gJIS�����R�[�h �@�A�@�@�̃V�t�gJIS�����R�[�h���@���v�̕ϊ����ɂ��ϊ�����JIS�����R�[�h�iJIS X 2013) �@�B�@�A��JIS�����R�[�h���@���v�̕ϊ����ɂ��ĕϊ������V�t�gJIS�R�[�h �@�@(��)�@�EJIS�����R�[�h�iJIS X 2013)�ɂ́A���ׂĂQ�o�C�g�����ł���B�@�V�t�g�i�h�r�̂P�o�C�g�����i������`�r�b�h�h�����A�`�m�j�����j�ɑΉ�����i�h�r�����R�[�h�͂Ȃ��B �@�@�@�@�@�E�i�h�r�����R�[�h�̒��Ɂ@������`�r�b�h�h�����A�`�m�j�����ɑ������镶���͂��邪�ʏ�V�t�g�i�h�r�̂`�r�b�h�h�����A�`�m�j�����ƑΉ�����Ƃ݂͂Ȃ��Ȃ��B �@�@�@�@�@�EJIS�����iJIS X 2013�j�͕����W���ł���A���ۂɃC���^�[�l�b�g�APC���Ŏg�p����鎞�́@���L�̕��������������Ŏg�p�����B �@�@�@�@�@�@�@�@1.�@ISO-2022-JP-2004 �@�@�@�@�@�@�@�@2.�@Shift_JIS-2004 �@�@�@�@�@�@�@�@3.�@EUC-JIS-2004 �@�@�@�@�@�@�@�@4.�@UTF-8 �@�@�@�@�@�E�@�h�r�n-2022�|�i�o�́@�P�o�C�g�����W���iASCII�����F0��20�`0x7F)�ƂQ�o�C�g�����W���iJIS�����F0x2121�`0x747e�j���ւ��Ďg�p���镶�������������ł���B �@�@�@�@�@�E�@�V�t�gJIS�́@�P�o�C�g�����W���iANK�����F0��20�`0x7f�A0xA0�`0xDF(�J�^�J�i�j)�@�ƂQ�o�C�g�����W���i0x2121�`0x747e��JIS���������v�̎Z�p���ɂ��V�t�g �@�@�@�@�@�@�@�����������W���j���ւ��Ďg�p���镶�������������ł���B |
||||||||||||||||||
|
�@�@�@�@ �@�@�@�@�@�@�@�@�@�@ �@���v���O�����၄
private: System::Void button1_Click(System::Object^ sender, System::EventArgs^ e)
{
array <Byte>^ mBytesArry = gcnew array<Byte>(2); //�}�l�[�W�`���̔z��̐錾
Encoding^ encSjis = Encoding::GetEncoding("shift-jis"); //�V�t�gJIS�̃G���R�[�h�N���X��錾�@&�@�C���X�^���X����
String^ myStr; //�L�[���͕���
String^ myStr1;
String^ str = textBox1->Text; //�e�L�X�g�{�b�N�X�̕�����擾
unsigned char* ptr0;
unsigned char* ptr1;
unsigned char BytesArry[2];
int ix = 0;
for each (int n in str) //�S�z��ɑ��ā@�ȉ������s
{
listBox1->Items->Insert(ix,str[ix].ToString()); //�z���ĕ\��
mBytesArry = encSjis->GetBytes(str[ix].ToString()); //'���M������unicode��Shift-jis�ɕϊ����Ă�Byte�z��Ɋi�[
try //2�o�C�g�����̏ꍇ
{
//�V�t�gJIS����
sjKanji[ix] = (unsigned int)((mBytesArry[0] << 8) + mBytesArry[1] ); //�V�t�gJIS
//bytesArry[0]:��ʃo�C�g�AbytesArry[1]:���ʃo�C�g
myStr = String::Format("0x{0}, 0x{1}",
Convert::ToString(mBytesArry[0],16),Convert::ToString(mBytesArry[1],16));//16�i���\��
listBox2->Items->Insert(ix,myStr); //�V�t�gJIS 16�i���\��
// listBox2->Items->Insert(ix,BitConverter::ToString(bytesArry)); //������ł�16�i���\�����ł���
listBox3->Items->Insert(ix,sjKanji[ix]); //�V�t�gJIS���������\��
//�V�t�gJIS�����@���@JIS�����ւ̕ϊ�
BytesArry[0] = (unsigned char)mBytesArry[0];
BytesArry[1] = (unsigned char)mBytesArry[1];
ptr0 = &BytesArry[0];
ptr1 = &BytesArry[1];
sJIS_to_JIS_ptr(ptr0,ptr1); //�|�C���^�n���@�@�V�t�gJIS�����@���@JIS����
myStr1 = String::Format("0x{0}, 0x{1}",
Convert::ToString(*ptr0,16),Convert::ToString(*ptr1,16));
listBox4->Items->Insert(ix,myStr1); //JIS����16�i���\��
jKanji[ix] = (*ptr0 << 8) + *ptr1;
listBox5->Items->Insert(ix,jKanji[ix]); //JIS���������\��
//JIS��������V�t�gJIS�����ւ̍ĕϊ�
JIS_to_sJIS_ptr(ptr0,ptr1); //�|�C���^�n��
myStr1 = String::Format("0x{0}, 0x{1}",
Convert::ToString(*ptr0,16),Convert::ToString(*ptr1,16));
listBox6->Items->Insert(ix,myStr1); //JIS����16�i���\��
sjKanji2[ix] = (*ptr0 << 8) + *ptr1;
listBox7->Items->Insert(ix,sjKanji2[ix]); //JIS���������\��
}
catch(Exception^ ) //1�o�C�g�����̏ꍇ
{
sjKanji[ix] = (unsigned int)mBytesArry[0];
myStr = String::Format("0x{0}",Convert::ToString(mBytesArry[0],16)); //16�i���\��
listBox2->Items->Insert(ix,myStr); //�V�t�gJIS 16�i���\��
listBox3->Items->Insert(ix,sjKanji[ix]); //�V�t�gJIS�@�����\��
listBox4->Items->Insert(ix,"�R�[�h�Ȃ�");
listBox5->Items->Insert(ix,"�R�[�h�Ȃ�"); //JIS���������\��
listBox6->Items->Insert(ix,myStr); //�V�t�gJIS 16�i���\��
listBox7->Items->Insert(ix,sjKanji[ix]); //�V�t�gJIS�@�����\��
}
ix++;
}
}
private: System::Void button2_Click(System::Object^ sender, System::EventArgs^ e)
{
textBox1->ResetText(); //�e�L�X�g�{�b�N�X�@�N���A
listBox1->Items->Clear(); //���X�g�{�b�N�X�P�@�N���A
listBox2->Items->Clear(); //���X�g�{�b�N�X�Q�@�N���A
listBox3->Items->Clear(); //���X�g�{�b�N�X�P�@�N���A
listBox4->Items->Clear(); //���X�g�{�b�N�X�Q�@�N���A
listBox5->Items->Clear(); //���X�g�{�b�N�X�Q�@�N���A
listBox6->Items->Clear(); //���X�g�{�b�N�X�Q�@�N���A
listBox7->Items->Clear(); //���X�g�{�b�N�X�Q�@�N���A
}
//�V�t�gJIS�����@���@JIS�����@�ϊ�
private: void sJIS_to_JIS_ptr(unsigned char* pHi,unsigned char* pLow)
{
unsigned int temp = 0;
if(*pHi >= 0xa0)*pHi = *pHi - 0xc1;
else *pHi = *pHi - 0x81;
if(*pLow >= 0x9f)
{
temp = (*pHi << 9) + 0x2200;
temp = (temp | *pLow) - 0x7e;
}
else
{
temp = (*pHi << 9) + 0x2100;
if(*pLow <= 0x7e)temp = (temp | *pLow) - 0x1f;
else temp = (temp | *pLow) - 0x20;
}
*pHi = (temp >> 8) & 0xff;
*pLow = temp & 0x00ff;
}
//JIS���� �� �V�t�gJIS�����@�ϊ�
private: void JIS_to_sJIS_ptr(unsigned char* pHi,unsigned char* pLow)
{
if(*pHi & 1) //LSB = 1�̏ꍇ
{
if(*pLow < 0x60)*pLow = *pLow + 0x1f;
else *pLow = *pLow + 0x20;
}
else *pLow = *pLow + 0x7e; //LSB = 1�̏ꍇ
*pHi = ((*pHi - 0x21) >> 1) + 0x81;
if(*pHi > 0x9f) *pHi = *pHi + 0x40;
}
�@ |
||||||||||||||||||
�����s���ʁ� |
||||||||||||||||||
|
���@���j�R�[�h�AJIS�����R�[�h�@�y�уV�t�gJIS�R�[�h����@������\������
|
||||||||||||||||||
| �ȉ��̃v���O�����ł� �E�@String^������A���j�R�[�h�AJIS�����@�y�уV�t�gJIS�̃o�C�g�z�������@ �E�@���j�R�[�h�AJIS�����@�y�уV�t�gJIS�̃o�C�g�z��String^����������� |
|
�@�@�@�@�@�@�@�@�@�@ �@���v���O�����၄
namespace CWhiteForm {
using namespace System;
using namespace System::ComponentModel;
using namespace System::Collections;
using namespace System::Windows::Forms;
using namespace System::Data;
using namespace System::Drawing;
using namespace System::Text; //Encoding�ɕK�{
/// <summary>
/// Form1 �̊T�v
/// </summary>
public ref class Form1 : public System::Windows::Forms::Form
{
public:
Form1(void)
{
InitializeComponent();
//
//TODO: �����ɃR���X�g���N�^�[ �R�[�h��lj����܂�
//
}
private: System::Void button1_Click(System::Object^ sender, System::EventArgs^ e) //Unicode
{
String^ str1 = "�Òr��";
Encoding^ uniEnc = Encoding::GetEncoding("Unicode");
array<Byte>^ ary1 = uniEnc->GetBytes(str1); //���j�R�[�h�̃o�C�g�z��ɕϊ�
String^ str2 = Encoding::GetEncoding("Unicode")->GetString(ary1); //���j�R�[�h�̔z������j�R�[�h��String^������ɕϊ�
richTextBox1->Text = str2;
}
private: System::Void button2_Click(System::Object^ sender, System::EventArgs^ e)//JIS����code
{
String^ str1 = "\n�^��э���";
Encoding^ jisEnc = Encoding::GetEncoding("iso-2022-jp");
array<Byte>^ ary1 = jisEnc->GetBytes(str1); //JIS�����R�[�h�̃o�C�g�z��ɕϊ�
String^ str2 = Encoding::GetEncoding("iso-2022-jp")->GetString(ary1); //JIS�����̔z������j�R�[�h��Sring^������ɕϊ�
richTextBox1->AppendText(str2);
}
private: System::Void button3_Click(System::Object^ sender, System::EventArgs^ e) //�V�t�gJIS
{
String^ str1 = "\n���̉�";
Encoding^ sjisEnc = Encoding::GetEncoding("Shift_JIS");
array<Byte>^ bytes = sjisEnc->GetBytes(str1); //�V�t�gJIS�̃o�C�g�z��ɕϊ�
String^ str2 = Encoding::GetEncoding("Shift_JIS")->GetString(bytes); //�V�t�gJIS�̔z������j�R�[�h��String^������ɕϊ�
richTextBox1->AppendText(str2);
}
private: System::Void button4_Click(System::Object^ sender, System::EventArgs^ e) //�N���A
{
richTextBox1->Clear();
}
�@ |
�����s���ʁ� |
���@���K�\���ɂ��A�\�[�X�R�[�h����0xXX��E�o
| ���K�\�����g���āA�\�[�X�R�[�h����@16�i���\�����i0xXX)���t�B���^�����O���ēE�o�����v���O�����ł��B | |
|
�@�@�@�@�@�@�@�@�@�@ Form1.h ����
�@���v���O�����၄
#pragma once
namespace CWhiteForm {
using namespace System;
using namespace System::ComponentModel;
using namespace System::Collections;
using namespace System::Windows::Forms;
using namespace System::Data;
using namespace System::Drawing;
using namespace System::Text::RegularExpressions; //���K�\���g�p�̂��ߒlj�
/// <summary>
/// Form1 �̊T�v
/// </summary>
public ref class Form1 : public System::Windows::Forms::Form
{
public:
Form1(void)
{
InitializeComponent();
//
//TODO: �����ɃR���X�g���N�^�[ �R�[�h��lj����܂�
//
}
private: System::Void button1_Click(System::Object^ sender, System::EventArgs^ e)
{
// OpenFileDialog �̐V�����C���X�^���X������ (�f�U�C�i����lj����Ă���ꍇ�͕K�v�Ȃ�)
OpenFileDialog^ openFileDialog1 = gcnew OpenFileDialog();//new OpenFileDialog();
// �_�C�A���O�̃^�C�g����ݒ肷��
openFileDialog1->Title = "�_�C�A���O�̃^�C�g�����R�R�ɏ���";
// �����\������f�B���N�g����ݒ肷��gc
openFileDialog1->InitialDirectory = "c:\\";
// �����\������t�@�C������ݒ肷��
openFileDialog1->FileName = "�����\������t�@�C�������R�R�ɏ���";
// �t�@�C���̃t�B���^��ݒ肷��
openFileDialog1->Filter = "�e�L�X�g �t�@�C��|*.txt;*.log|���ׂẴt�@�C��|*.*";
// �t�@�C���̎�� �̏����ݒ�� 2 �Ԗڂɐݒ肷�� (�����l 1)
openFileDialog1->FilterIndex = 2;
// �_�C�A���O�{�b�N�X�����O�Ɍ��݂̃f�B���N�g�������� (�����l false)
openFileDialog1->RestoreDirectory = true;
// �����̃t�@�C����I���\�ɂ��� (�����l false)
openFileDialog1->Multiselect = true;
// [�w���v] �{�^����\������ (�����l false)
openFileDialog1->ShowHelp = true;
// [�ǂݎ���p] �`�F�b�N�{�b�N�X��\������ (�����l false)
openFileDialog1->ShowReadOnly = true;
// [�ǂݎ���p] �`�F�b�N�{�b�N�X���I���ɂ��� (�����l false)
openFileDialog1->ReadOnlyChecked = true;
// ���݂��Ȃ��t�@�C�����w�肵���ꍇ�͌x����\������ (�����l true)
openFileDialog1->CheckFileExists = true;
// ���݂��Ȃ��p�X���w�肵���ꍇ�͌x����\������ (�����l true)
openFileDialog1->CheckPathExists = true;
// �g���q���w�肵�Ȃ��ꍇ�͎����I�Ɋg���q��t������ (�����l true)
openFileDialog1->AddExtension = true;
// �L���� Win32 �t�@�C���������������悤�ɂ��� (�����l true)
openFileDialog1->ValidateNames = true;
// �_�C�A���O��\�����A�߂�l�� [OK] �̏ꍇ�́A�I�������t�@�C����\������
if (openFileDialog1->ShowDialog() == System::Windows::Forms::DialogResult::OK)
{
// StreamReader �̐V�����C���X�^���X������
System::IO::StreamReader^ cReader = (
gcnew System::IO::StreamReader(openFileDialog1->FileName, System::Text::Encoding::Default)
);
// �t�@�C���̍Ō�܂œǂݍ���
String^ stBuffer = cReader->ReadToEnd();
// cReader ����� (�������� �I�u�W�F�N�g�̔j����ۏ��� ���Q��)
cReader->Close();
richTextBox1->Text = stBuffer;
String^ str = openFileDialog1->FileName; //�_�C�A���O�̃^�C�g�����t���p�X�̃t�@�C�����ɕύX
this -> Text = str;
// �s�v�ɂȂ������_�Ŕj������ (�������� �I�u�W�F�N�g�̔j����ۏ��� ���Q��)
delete openFileDialog1; // ���L�R�[�h�̓R���p�C��NG�FopenFileDialog1->Dispose();
}
}
private: System::Void button2_Click(System::Object^ sender, System::EventArgs^ e)
{
//��s�͎c�����ꍇ
Regex^ re = gcnew Regex("\\{(?<moji>[0-9A-Fa-fx\\r\\s,]+)\\}");
String^ st = re->Match(richTextBox1->Text)->Result("${moji}")->TrimStart()->TrimEnd();
richTextBox2->Text = st;
////��s���c���Ȃ��ꍇ
////"{"����"}"�܂ł̊Ԃ��ۂ��Ɣ����o��//"0x[0-9a-fA-F][0-9a-fA-F],"�܂���"\r\n"��1��ȏ�̌J��Ԃ��������āA"{"����n�܂���"}"�ŏI���܂ł̊�
//Regex^ r = gcnew Regex("0x[0-9a-fA-F][0-9a-fA-F],( |\r\n)", System::Text::RegularExpressions::RegexOptions::IgnoreCase);
//Match^ m = r->Match(richTextBox1->Text);
//richTextBox1->Text = String::Empty;
//while (m->Success)
//{
// richTextBox1->Text += m->Value;
// m = m->NextMatch();
//}
}
private: System::Void button3_Click(System::Object^ sender, System::EventArgs^ e)
{
String^ str = richTextBox2->Text;
richTextBox2->Clear();
str = str->Replace("\n", ""); //���s�R�[�h�폜
str = str->Replace(" ", ""); //�폜
str = str->Replace("\t", ""); //�����^�u�L�[�폜
richTextBox2->Text = str;
}
};
}
�@ |
|
�����s���ʁ�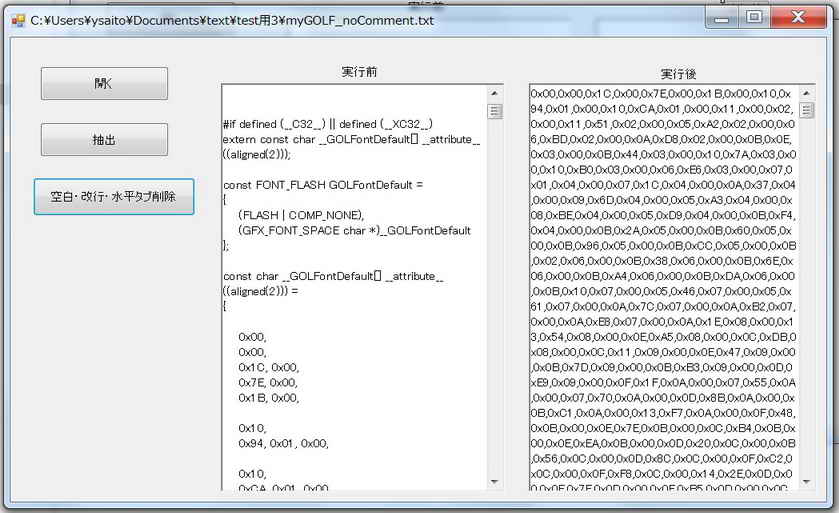 |
�@�@�@�@�@�@�@�@�@�@
�@���v���O�����၄
main() { }
�@
![]() �@�@�@�@�@�@�@
�@�@�@�@�@�@�@![]()


